As a freelance developer, I want my clients to have an easy to use interface when creating posts. Before WP 5.0 (and before Gutenberg) I used Advanced Custom Fields a lot for this purpose.
An example interface for a Book post, could look something like this:
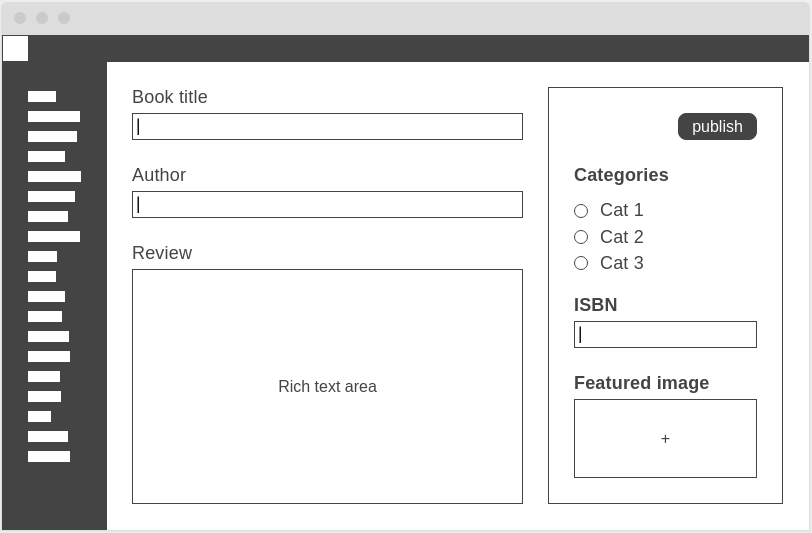
As you can see, I want to add the most important fields in the main area, and some additional settings and fields could be added in the sidebar.
Now, before Gutenberg this was pretty easy to achieve with Advanced Custom Fields. But since the block editor started to reinvent everything it’s forcing us, developers, to reinvent our custom user interfaces too.
Ideally, we would want to simply replace the Rich text area part with the block-editor. But that’s not possible. If you enable Gutenberg, it will hijack the entire screen, only leaving a custom-fields area at the very bottom for backwards compatibility.
While you could stuff all your custom fields in the bottom area, it’s not a fun user experience for your clients. If they need to scroll all the way down to fill out mandatory fields, that just feels… wrong.
We could also cram everything in the sidebar. But I think there’s simply not enough room there to create a nice flow.
Embrace the block editor
We need to start thinking with blocks, because it’s all we have. Concepts like shortcodes and metadata, that we all got to know and love, are going to disappear.
We have gotten so used to these concepts, that we have probably even forgotten how frustrating they can be to work with. For example, did you ever ask your client to add a snippet of code like [my-gallery ids="12,24,37" columns="3"], and edit it directly?
While this might work for some clients, often we end up editing their website ourselves and charging them extra for it. While we actually promised them a CMS they could use to edit everything themselves. Not cool.
Use a block template
It is possible to define a unique block template for each content type. You can define these templates in your PHP code inside the register_post_type function. For our Book post type, it might look something like this:
$labels = [ ... ];

$args = [
    'labels'        => $labels,
    'public'        => true,
    'show_in_rest'  => true,
    'supports'      => [ 'editor', 'thumbnail' ],
    'taxonomies'    => [ 'category' ],
    'template_lock' => 'all',
    'template'      => [
        [ 'myplugin/book-settings' ],
        [ 'myplugin/content-group', [], [
            [ 'core/paragraph' ]
        ] ]
    ]
];

register_post_type( 'book', $args );
First of all, make sure to set 'public' to true, so the post type shows up in your admin interface. Also set 'show_in_rest' to true to enable Gutenberg for this post type.
The 'template' has two custom blocks as the root elements.
The first one, myplugin/book-settings, will hold the fields for “Book title” and “author”.
The second block, myplugin/content-group, will be a custom block, that will work exactly as a group block. (We cannot use the builtin group block for this because we are going to overwrite the template lock on it.)
'template_lock' will be set to 'all', because we want to prevent the user from moving or adding blocks anywhere else then in our content-group area.
Finally, we also add support for the editor and thumbnail, and we enable categories for this post type.
Create the settings block
We could make sure the settings block saves it’s values as attributes to the block itself, which is the most straight forward way, and would generate HTML that looks like this:
<!-- wp:myplugin/book-settings {
    "bookTitle":"Slaughterhouse Five",
    "author":"Kurt Vonnegut Jr."
}/-->
Adding attributes to blocks like this is well documented, and if you have some experience with creating blocks, you should have no trouble with this.
However, instead of saving the settings to the block itself, I’m going to save them as post meta. This is also explained well in the WP docs, but it’s a bit less common, so I will quickly walk trough the code.
This is the code to register the settings block.
const { registerBlockType } = wp.blocks;
import { TextControl } from '@wordpress/components';

import './editor.scss';

registerBlockType( 'myplugin/book-settings', {
	title: 'Book Settings',
	category: 'common',
	supports: {
		anchor: false,
		html: false,
		reusable: false,
		inserter: false,
		multiple: false,
		className: false,
		customClassName: false,
	},
	attributes: {
		bookTitle: {
			type: 'string',
			source: 'meta',
			meta: '_myplugin_book_title',
		},
		author: {
			type: 'string',
			source: 'meta',
			meta: '_myplugin_author',
		},
	},
	edit( props ) {
		const { className, attributes, setAttributes } = props;
		const { bookTitle, author } = attributes;

		return (
			<div className={ className }>
				<TextControl label="Book Title" value={ bookTitle || '' } onChange={ ( value ) => {
					setAttributes( { bookTitle: value } );
				} } />
				<TextControl label="Author" value={ author || '' } onChange={ ( value ) => {
					setAttributes( { author: value } );
				} } />
			</div>
		);
	},
	save: () => null,
} );
In order to make sure that our attributes are saved as post-meta, we need to add 2 additional properties to each of the attributes:
- source: ‘meta’
- meta: ‘_your_custom_field_name’
We also need to make sure that our meta fields are registered. This can be done with the register_post_meta function in the 'init' hook, right after registering our post type, like so:
$custom_fields = [
    '_myplugin_book_title',
    '_myplugin_author',
    '_myplugin_book_isbn',
];

foreach ($custom_fields as $custom_field) {
    register_post_meta('book', $custom_field, array(
        'show_in_rest' => true,
        'type' => 'string',
        'single' => true,
        'sanitize_callback' => 'sanitize_text_field',
        'auth_callback' => function() {
            return current_user_can( 'edit_posts' );
        }
    ));
}
This concludes our settings block. Before we can test this, we need to also create the myplugin/content-group block, since it’s defined in the Book template. So let’s do that now!
Create the Content-group block
The code to create the content-group block, looks like this:
const { registerBlockType } = wp.blocks;
const { InnerBlocks } = wp.editor;

import './editor.scss';

registerBlockType( 'myplugin/content-group', {
	title: 'Content Group',
	category: 'layout',
	supports: {
		anchor: false,
		html: false,
		reusable: true,
		inserter: true,
		multiple: false,
		className: false,
		customClassName: false,
	},
	edit: ( { className } ) => {
		return (
			<div className={ className }>
				<InnerBlocks templateLock={ false } />
			</div>
		);
	},
	save() {
		return (
			<div>
				<InnerBlocks.Content />
			</div>
		);
	},
} );
In the edit function we will return the InnerBlocks component, which will allow for nesting blocks. We also need to set the templateLock={false} to override template_lock='all' that was set during post type registration, otherwise we would not be able to add new blocks.
Then, in the save implementation, we render InnerBlocks.Content. This will be replaced automatically with the content of the nested blocks.
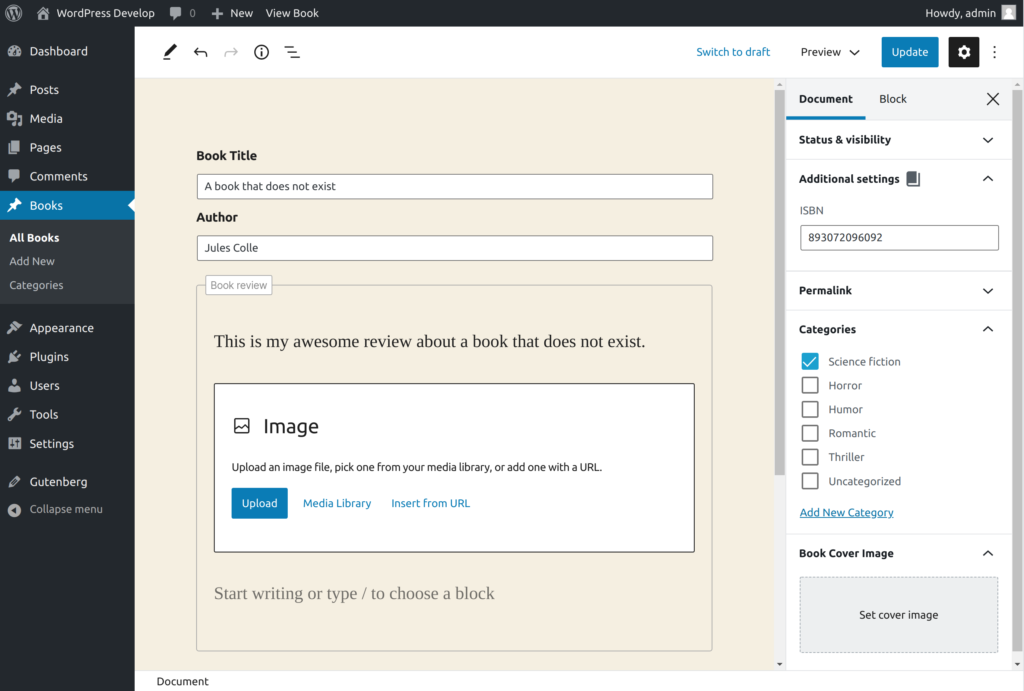
After making sure that we include the JS files for both the settings block and the content-group block, we can create a new Book.
Create a sidebar panel for additional document settings
We’re almost done. The only thing left to do is to create a ISBN number field in the sidebar. There are a couple of ways to go about this, but I will be working with the SlotFill technique, and more specifically with the PluginDocumentSettingPanel. Instead of creating an additional sidebar for our settings, this allows us to inject a custom panel inside the main document sidebar.
const { registerPlugin } = wp.plugins;
const { PluginDocumentSettingPanel } = wp.editPost;
const { useCallback } = wp.element;
const { useSelect, useDispatch } = wp.data;

registerPlugin( 'additional-settings', {
  icon: 'book',
  render: () => {
    const postType = useSelect( select => select( 'core/editor' ).getCurrentPostType() );
    if ( 'book' !== postType ) {
      return null;
    }

    const isbn = useSelect( select => {
      return select( 'core/editor' ).getEditedPostAttribute( 'meta' )._myplugin_book_isbn;
    }, [] );

    const { editPost } = useDispatch( 'core/editor' );
    const onChangeIsbn = useCallback( ( value ) => {
      editPost( { meta: { _myplugin_book_isbn: value } } );
    }, [ ] );

    return (
      <PluginDocumentSettingPanel
        name="additional-settings"
        title="Additional settings"
      >
        <TextControl
          label="ISBN"
          value={ isbn }
          onChange={ onChangeIsbn }
        />
      </PluginDocumentSettingPanel>
    );
  },
} );
Since these settings are not related to a block, we need to use registerPlugin from the wp.plugins package.
registerPlugin has a render property, which is more or less equivalent to registerBlocktype.edit. The main difference with how we rendered blocks, is that registerPlugin does not have an attributes property. So we need to create our own functions to update the post meta.
Let’s break down all the lines of code in the render function.
const postType = useSelect( select => select( 'core/editor' ).getCurrentPostType() );
if ( 'book' !== postType ) {
  return null;
}
The code above makes sure that our custom panel will only be loaded on Book edit screens.
const isbn = useSelect( select => {
  return select( 'core/editor' ).getEditedPostAttribute( 'meta' )._myplugin_book_isbn;
}, [] );
isbn will hold the value of our _myplugin_book_isbn custom field. The useSelect hook ensures that isbn will always have the most up to date value and that the render function will be called each time this value gets updated.
const { editPost } = useDispatch( 'core/editor' );
const onChangeIsbn = useCallback( ( value ) => {
  editPost( { meta: { _myplugin_book_isbn: value } } );
}, [ ] );
To be honest, I’m not 100% sure about this code. useDispatch is not well documented, and I’m not an expert with Redux, but here’s my 2 cents:
Instead of setting the value directly with
wp.data.dispatch( 'core/editor' ).editPost( { meta: { _myplugin_book_isbn: value } } );which will also work fine, I wanted to give useDispatch a try. To be honest, I’m not sure about the benefits of this yet, but this code seems to work, so I decided to keep it like this. I’ll probably come back and adjust this explanation once I understand why it’s better or worse.
return (
  <PluginDocumentSettingPanel
    name="additional-settings"
    title="Additional settings"
  >
    <TextControl
      label="ISBN"
      value={ isbn }
      onChange={ onChangeIsbn }
    />
  </PluginDocumentSettingPanel>
);
The code above, renders the actual components.
Check out the full source code on GitHub.
Problems with this approach
There are a couple of problems with this approach.
Most of the problems result from using template_lock=true in combination with templateLock={false}, which is not working as it should in Gutenberg right now. If you are interested, here’s a GitHub issue about it, that also addresses some workarounds.
Thanks for reading this far! If you catch any errors, please let me know. I’m writing this stuff down as am learning it.